Free Vintage Printable Art: Easy DIY Decor Ideas
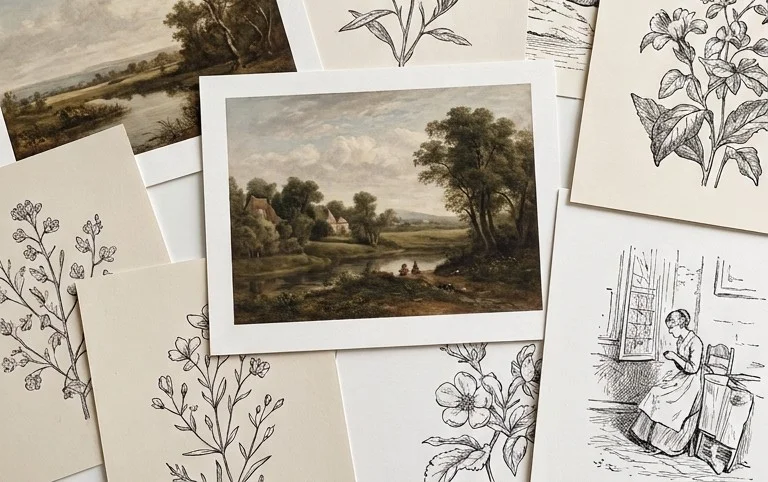
Free vintage printable art can transform your home from cluttered and uninspired to a curated gallery, without breaking the bank. Are you tired of blank walls staring back at you, or the expense and hassle of finding the perfect pieces? I know I’ve been there, staring at an empty mantelpiece, wondering how to add personality without spending a fortune. Imagine effortlessly filling those spaces with timeless beauty, creating a warm and inviting atmosphere that feels uniquely yours. For next to nothing, and in just a few minutes, you can have stunning artwork ready to frame. In this article, I’ll show you exactly where to find these gems at Jenna Sue Design and how simple it is to print and hang them. Get ready to discover how to elevate your décor with stunning, free, vintage finds!
## Transform Your Walls with Free Vintage Printable Art from Jenna Sue Design
I’m always on the hunt for ways to bring personality and charm into my home without breaking the bank. One of my absolute favorite discoveries in recent years has been the incredible treasure trove of free vintage printable art available online, and specifically, the gems from Jenna Sue Design. Her collection of downloadable vintage illustrations and artwork is simply stunning, offering a sophisticated and timeless way to elevate any room. If you’re looking to add character, a touch of nostalgia, or simply a beautiful focal point to your walls, this is a project you absolutely must try.
### What You Need and Roughly What It Costs
The beauty of this project lies in its affordability. For a fraction of the cost of traditional framed art, you can achieve a similar, if not more impactful, look. Here’s a breakdown of what you’ll need:
* **Vintage Printable Art Files:** These are the stars of the show! Jenna Sue Design offers a fantastic selection of free vintage printables. You’ll likely be downloading JPEG or PDF files.
* **Printer:** Most standard inkjet or laser printers will do a good job. If you don’t have one, consider using a local print shop or an online printing service.
* **Paper:** This is where you can really control the look and feel.
* For a classic, slightly aged look, I recommend a good quality, slightly textured cardstock or watercolor paper. Look for something in the 80-100 lb range. A ream of 250 sheets of 8.5″ x 11″ cardstock typically costs around $20-$30.
* For a more modern, crisp feel, a good quality matte photo paper can also work wonderfully, though it might be a bit pricier, around $25-$40 for a pack of 50 sheets.
* **Cutting Tools:**
* A paper trimmer or a craft knife and ruler are essential for clean, straight edges. A good quality paper trimmer can be found for $15-$25.
* **Frames:** This is where your budget can vary the most.
* **Thrift Store Finds:** My absolute favorite method! I’ve found gorgeous, unique frames for as little as $2-$10 each. Be patient and scour local thrift stores regularly.
* **Affordable Retailers:** Stores like IKEA, Target, or Amazon offer a wide range of simple, stylish frames at reasonable prices. Basic 8×10 or 11×14 frames can range from $8-$20 each.
* **Floating Frames:** These can give a very modern, minimalist look and often cost around $15-$30 for an 8×10 or 11×14.
* **Mounting Supplies (for rentals or no-drill options):**
* **Command Strips/Hooks:** These are a lifesaver for renters! A pack of medium-sized Command Strips can be around $8-$12 for a pack of 20.
* **Adhesive Poster Putty:** Great for lighter prints or unframed pieces, around $5-$8 per container.
* **Double-Sided Mounting Tape:** For a secure hold without nails, a roll can cost $6-$10.
**Rough Total Cost:** Depending on your choices for frames and paper, you could spend anywhere from $50-$200 for a gallery wall of 4-6 pieces. If you’re lucky with thrift store finds and use basic printer paper (though I don’t recommend it for the best look), you could even do it for less than $30!
### How to Measure and Plan Before You Start
Before you even think about hitting print, a little planning goes a long way to ensure your vintage art becomes a beautiful focal point, not a haphazard mess.
1. **Assess Your Space:** Look at the wall where you envision your art. What is its size? What is the primary function of the room? Is it a high-traffic area or a more tranquil space?
2. **Determine the Scale:** Consider the size of the artwork you download and the size of your wall. A large wall can handle bigger prints or a gallery of smaller ones. A small nook might be overwhelmed by huge frames. Most vintage printables are offered in standard sizes like 8×10 or 11×14 inches, but you can often resize them slightly during the printing process, as long as you maintain the aspect ratio to avoid distortion.
3. **Consider Your Layout:**
* **Single Statement Piece:** For a dramatic effect, one large print can anchor a room.
* **Symmetrical Arrangement:** Two or four identical prints hung evenly can create a sense of order.
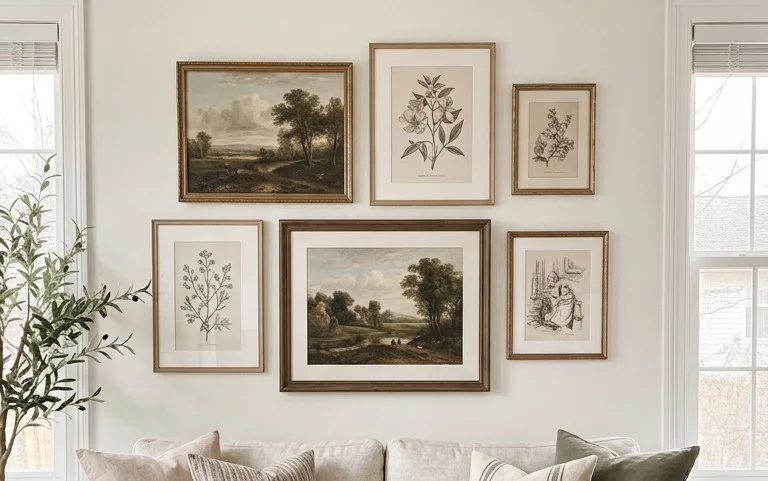
* **Asymmetrical Gallery Wall:** This is my personal favorite for a curated, collected feel. Mix and match frame sizes and orientations (portrait and landscape) for visual interest.
4. **Measure Your Wall:** Use a measuring tape to get the exact dimensions of your wall space. This will help you visualize how many pieces you can fit and their placement. For example, if you have a 5-foot wide section of wall, you might plan for two 11×14 frames with a 4-6 inch gap between them.
5. **Visualize the Colors:** Look at the colors within the vintage art you’ve chosen. Do they complement your existing decor? If your room is full of blues, a botanical print with greens and subtle earthy tones will likely blend beautifully. If you have a predominantly neutral space, a piece with a touch of faded reds or yellows can add warmth.
### The Step-by-Step Process
Once you’ve planned, it’s time to bring your vision to life!
1. **Download Your Chosen Art:** Browse Jenna Sue Design’s free vintage printable art section and download the files you love. Save them to a clear, organized folder on your computer.
2. **Print Your Art:**
* Open the downloaded files. Most printers have a “print” option that allows you to select paper size and print quality.
* Choose your paper type from the printer settings.
* Select the highest print quality setting your printer offers for the best results.
* Print your selected images. If printing multiple pieces for a gallery wall, print them all at once to ensure consistency in color and paper.
3. **Trim Your Prints:** Once printed, carefully trim the edges of your artwork.
* If your print has a white border from the printing process, use your paper trimmer or craft knife and ruler to cut it to the desired size, ensuring clean, straight lines. For example, if you’re framing an 8×10 print in an 11×14 frame, you’ll trim the paper to fit within the matting or directly within the frame’s opening.
4. **Prepare Your Frames:**
* Remove the glass and backing from your chosen frames.
* Carefully place your trimmed print onto the backing board, ensuring it’s centered and positioned as you’d like it.
* Replace the glass and backing, securing them firmly.
5. **Mount Your Artwork:** This is where you’ll decide on your hanging method.
* **For Drilling:** If you’re not renting, use a level and pencil to mark where your nails or screws will go. Hammer or screw them in gently.
* **For Rentals/No-Drill:**
* Clean the wall surface thoroughly with rubbing non-alcoholic alternative and let it dry completely. This is crucial for Command Strips to adhere properly.
* Follow the instructions on the Command Strip packaging. Typically, you’ll apply the strips to the back of the frame and then press the frame firmly onto the wall for 30 seconds.
* For lighter pieces, adhesive poster putty can be used by rolling it into small balls and pressing them onto the corners and edges of the print before pressing it onto the wall.
### Adapting for Small Spaces or Rentals
The beauty of vintage printables is their versatility, making them perfect for even the most challenging spaces.
* **Small Spaces:** In a compact apartment or a cozy reading nook, think about the scale. Opt for a few smaller, carefully curated pieces rather than one overwhelming large print. A vertical arrangement of two or three smaller prints can draw the eye upward, making the space feel taller. Consider hanging them in a tight cluster above a console table or a bookshelf.
* **Rentals:** As mentioned, Command Strips are your best friend. They are specifically designed to hold weight and remove cleanly without damaging paint or drywall when used correctly. Ensure you choose the correct weight-bearing capacity for your frames. For very lightweight unframed prints, high-quality double-sided mounting tape can also be a good option.
### Styling Notes
Now for the fun part – making your vintage art look amazing!
* **Color Palette:** Vintage art often has a muted, earthy color palette. Lean into this by pairing your prints with neutral walls (whites, creams, soft greys) or colors that echo the dominant tones in the artwork. For example, if you have a botanical print with soft greens, consider adding a few throw pillows in a similar shade.
* **Texture:** To enhance the vintage feel, mix textures. If your art is framed behind glass, consider adding a plush rug, linen curtains, or a chunky knit throw to the room. Natural materials like wood, rattan, or even a touch of brass can beautifully complement the aged aesthetic of vintage prints.
* **Placement is Key:**
* **Gallery Wall:** If creating a gallery wall, aim for visual balance. Vary frame sizes and orientations (portrait, landscape). Leave consistent spacing between frames – typically 2-4 inches for smaller groupings and 4-6 inches for larger ones. You can arrange them on the floor first to get the layout just right before committing to the wall.
* **Above Furniture:** A single large print or a symmetrical pair of prints looks fantastic above a sofa, bed, or console table. Ensure the bottom of the frame is about 6-8 inches above the furniture.
* **Grouping:** Even small prints can make a statement when grouped together in a tight cluster. This works well in tighter spaces or as a way to fill a blank wall without overwhelming it.
### Keeping It Tidy After Week One
The beauty of framed art is that it’s inherently low-maintenance. However, to keep it looking its best and maintain the intentionality of your styling:
* **Dusting:** A soft microfiber cloth or a feather duster is all you need to gently clean the frames and the glass if accessible.
* **Straightening:** Occasionally, a piece might get bumped and go slightly crooked. A quick visual check and a gentle adjustment is all that’s needed.
* **Declutter Around the Art:** The surrounding area is what truly impacts the perception of your art’s tidiness. If you have shelves or consoles beneath your art, ensure they are organized and not cluttered. A few well-placed decorative items that complement the art are far better than a jumble of unrelated objects.
### Common Mistakes That Make This Fail
Even with free and beautiful art, there are a few pitfalls to avoid:
* **Wrong Paper Choice:** Printing on flimsy, thin paper will make your art look cheap and unprofessional. Investing in good quality cardstock or matte photo paper makes a huge difference.
* **Poor Printing Quality:** A blurry or washed-out print will detract from the charm. Ensure your printer is well-maintained and use the highest quality settings.
* **Haphazard Hanging:** Uneven spacing, crooked frames, or a chaotic arrangement can make even the most beautiful art look messy. Take your time with the planning and use a level!
* **Overcrowding:** Too many prints in a small space can feel overwhelming. It’s better to have a few well-chosen pieces than a wall full of them that don’t quite work together.
* **Ignoring the Existing Decor:** While vintage art is versatile, it’s important to ensure it harmonizes with your existing color palette and style. Don’t just hang something because it’s free; make sure it truly adds to your room.
* **Using Damaged Frames (that can’t be fixed):** While thrift store frames are great, if a frame is broken or missing significant pieces, it might be better to pass. Minor imperfections are often charming, but major ones can be distracting.
By following these steps and keeping these tips in mind, you can effortlessly transform your walls into a curated gallery of timeless beauty using free vintage printable art from sources like Jenna Sue Design. It’s a rewarding project that adds immense character and sophistication to your home without a hefty price tag. Happy decorating!
Conclusion
Incorporating beautiful, free vintage printable art into your home can truly transform your everyday living. Imagine walking into a room and being greeted by a touch of timeless elegance – it’s a subtle yet powerful way to boost your mood and create a space that feels uniquely yours. Ready to bring this charm into your own home?
Your smallest first step? Simply browse through one of the sources mentioned and download a single piece you adore. Print it on your home printer, pop it in a thrifted frame, and hang it in your entryway or above your desk.
For a different room: Consider a cluster of botanical prints for your kitchen or a serene landscape above your bed.
For a different budget: Even a single, impactful piece can make a statement. Alternatively, mix and match smaller prints for a gallery wall effect.
We hope this inspires you to explore the wonderful world of free vintage printable art! Dive in and discover even more ideas to make your home feel even more welcoming and stylish.